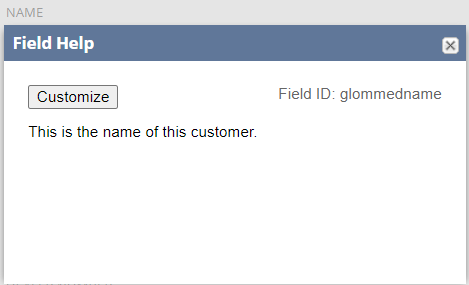
What is “glommedname” and why isn’t it in the Record Browser or Saved Search options??

You may have stumbled across the Name field on a NetSuite customer record and scratched your head as to why you couldn’t add it to the criteria or results of a Saved Search. You hit up the Record Browser, but can’t find it listed anywhere… so then you do the next best thing… Google, or your preferred search provider. So now you’re here.

To be honest, I felt really ignorant when I realized what this was. So I wanted to make this post to spare you my pain and embarrassment when I figured it out. For more context, we had a 3rd party contracted company assisting with an integration between two platforms. Unfortunately, the contracted party does not provide back end access to their field mappings. So there I was, trying to figure out where this data was coming from, why, and how many customer records were impacted.

While trying to create a Saved Search to find all impacted customer records for this “Name” field I kept running into a weird problem. I had “Name” assigned in the results… but why didn’t it show the same as on the customer record. That’s when I found the unusual field ID that either I’d never seen, or just never noticed before.

Ok, so what is “glommedname” already?

The “glommedname” field ID linked to the Name field on a customer record is specific to Individual customer types. Meaning, you will not find this on any customers that have been assigned as a Company type.

To put it simply, the “glommedname” field ID is just a concatenation of the field IDs “firstname”, “middlename” and “lastname” that is only available for Individual customer entities.

Here is what the three fields look like while editing the record:

And this is what it would look like if I had saved the information on the customer record, again set with Type = Individual.

How to get it to appear on a Saved Search

1. Create a new Customer Search

2. Assign the criteria you’re wanting to find. In my case, I’m just going to look for the customer that I just created. It’s in the Sandbox.

3. Now move to the results tab. Here for comparison sake, add Name, First Name, Middle Name, and Last Name.
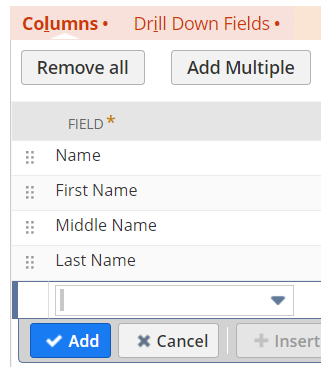
4. Either preview, or save and run your search, here’s what you should see.

Note that in this example search, “Name” is in my environment the Client ID field or “entityid”. The only way to find “glommedname” is by breaking it out into the three fields mentioned above.

I hope this saves someone else several minutes of frustration.
Packing Slip PDF is set as Preferred, but not being used?

So, you’ve created a new custom form for your packing slips and assigned the Print or Email Template as a new Advanced PDF/HTML Template, but for some reason when you try to print the PDF it’s using the wrong PDF Template? There is actually one more step for you to check aside from assigning your Packing Slip PDF as the preferred PDF template on the Packing Slip form. I always forget this myself. It’s useful to know for Picking Tickets as well. You need to update the Custom Form assignments on the Sales Order form itself!

Edit Sales Order Form

Path Option One

  1. Navigate to Customization > Forms > Transaction Forms
  2. Scroll down until you find your preferred Sales Order form and click on Edit.

Path Option Two

  1. Navigate to Transactions > Sales Orders > Enter Sales Order
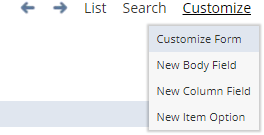
  2. Hover over Customize > Customize Form (it is on the top right corner of the form, in small print.)

After opening your preferred Sales Order form in Edit mode…

  1. On the blue banner mid screen click on the Linked Forms Sublist.
  2. From here you need to assign the custom form associated with each applicable record type.

Your options should look something like:

  • Cash Sale
  • Invoice
  • Item Fulfillment
  • Packing Slip
  • Picking Ticket
  • Purchase Order (Drop Shipment)
  • Purchase Order (Special Order)
  • Return Authorization
  • Store Pickup Fulfillment

Because the PDF Template is linked to the Custom Form you previously created, this will tell NetSuite to use those forms by default when progressing your transactions to the next step.

Mystery! I can’t see any Undeposited Payments when Making a Deposit.

Today we have quite the mystery on our hands. You’ll be completely shocked by the solution as well!

If you’ve found this page, you’ve probably run into an issue where when you navigate to Transactions > Bank > Make Deposits… You’re unable to see any payments listed just like this!

Do you use any custom filters? No?

  1. Here are a few things I would double check, verify another user hasn’t already processed the deposit. I know that’s really obvious, but you would be shocked at how often this can happen if you have a large team. It never hurts to rule out the simple things first!
  2. Clear your Browser Cache. We’ve seen a lot of issues easily resolved by doing this. Some data can get trapped in a continuous loop because your Browser holds on to data to make loading pages faster. Sometimes this happens and causes issues with NetSuite too.
  3. In your search bar type “page: Customer Payments”. Verify if you have any filters set on the page. It’s possible that a filter you have set here could be restricting the Payments you’re able to see when making Deposits.
  4. Lastly, if you’re like us… you double checked NetSuite SuiteAnswers. We found an article titled Make Deposits> Undeposited Payments not Appearing on the Payments subtab” This was exactly what our issue was. Or so we thought!

Scenario

The customer is unable to see the undeposited payments on the Payments Subtab on the Make Deposit page. 

Solution

1. Update the payment status from “Undeposited” to “Deposited” to appropriate cash account via CSV import.

or

2. Ask other users with an Administrator Role to process the deposit.

https://netsuite.custhelp.com/app/answers/detail/a_id/62850/kw/User%20unable%20to%20make%20deposits

Sometimes getting another user to do the job just isn’t an option…

Do you use any custom filters? Oh, that’s a yes?

So do we, we aren’t CTRL+F lunatics around here… all the time.

To save you some heartache or prevent your mouse from a premature retirement, here’s what was wrong in our scenario. What?! You’re going to tell me what the problem was before making me jump through hoops? Yeah… because it’s so frustratingly… frustrating that I wouldn’t wish it on anyone!

Click into each of your filter fields and hit backspace.

Yep, that’s it! At least in our case it was. Since this was isolated to a singular employee record and we’d expended all of our options, we knew it had to be something on the user end. A sneaky space was hiding in a free form field the entire time. I imagine it was sitting there with popcorn, mocking us, and laughing at our misery.

These are the steps we took to find our solution:

  1. Make note of what filters you use. Grab scrap paper, junk envelop, or the tissue you’ve been wiping your eyes with and jot down what those are so we can use the process of elimination.
  2. On the light blue ribbon just below your filters on the Payments subtab, click on “Customize”.
  3. Click on “Available Filters” and un-check all of the filters there. This is why we wrote them down before hand. When all are un-checked click on Save.
  4. Now go back to Transactions > Bank > Make Deposit. You should see all payments again.
    Being able to see all of the payments after removing the filters is what gave it away. It was clearly attempting to filter by something!
  5. This is the tedious part if you have more than one filter. One by one, add a filter back. Check to see if you still see all payments. Repeat this step until your payments disappear again. When they disappear, you know that this is the field that has some funny business going on.

Hopefully this was useful information, if you have any questions or comments please let me know! If you are still having issues, I recommend working with NetSuite Support directly. As always, I appreciate feedback good, bad, and ugly.

Have a wonderful day!

Enabling and Using Consolidated Project Billing

To enable this feature, you must have the Project Management Option available to your NetSuite account.

Setup:

Navigate to Setup > Accounting > Accounting Preferences

On the Accounting Preferences page, navigate to Items/Transactions.

Scroll down to the Sales & Pricing section and check the box next “Consolidate projects on sales transactions”

Once checked, save your settings. The last thing to do is make sure it’s working!

Add Multiple Projects to a Sales Order:

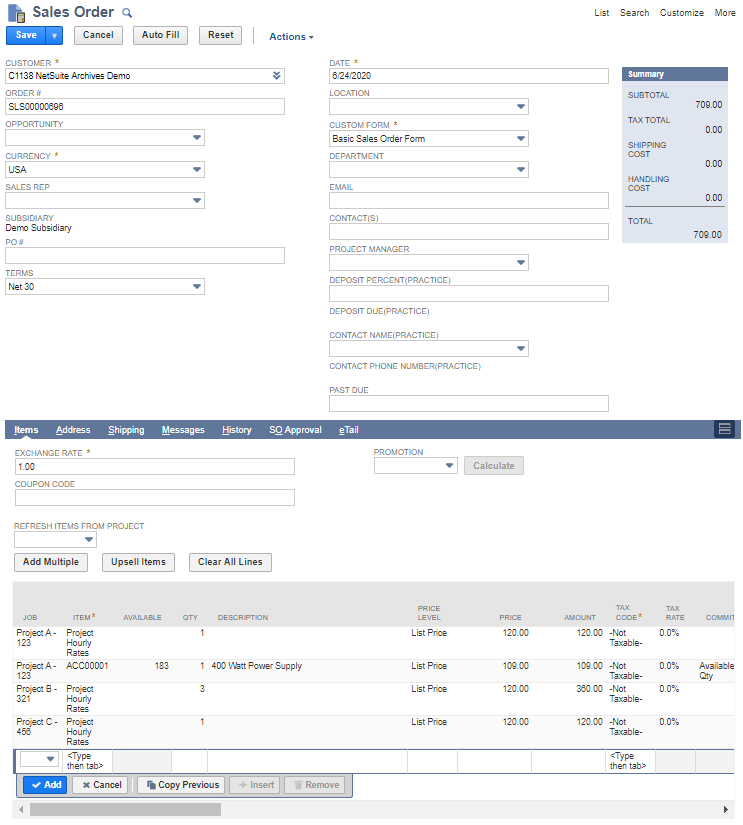
In this example, My client “NetSuite Archives Demo” would like only one invoice for 3 projects we have in the works for them.

Open a new or existing Sales Order that you’d like to modify. Enter all details as you would normally with the exception that there is now a new column available on your Items Sublist. Depending on the naming convention of your environment, it could be listed as either Job, Project, or something different. On my Sales Order, it’s listed as “Job”.

Because we’ve enabled the consolidated billing feature, we can now add each project as it’s own transaction line item.

I’ve entered the basic information required for my transaction.
Note this is a dev environment and does not reflect actual data.

If we take a closer look at the Items, you can see I was able to add all 3 projects for their hourly rates as well as any additional items that may have been relevant for that particular project. The 400W Power Supply as an example for Project A -123.

Once the Sales Order is saved, any items can be fulfilled if needed and Accounting/Billing Team or whoever handles client billing can now do so with one invoice.

Hopefully this was useful information, if you have any questions or comments please let me know! As always, I appreciate feedback good, bad, and ugly. Have a wonderful day!

Using a List of Internal ID’s in a Saved Search?

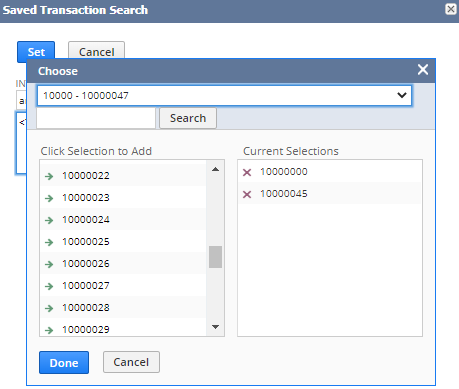
If you’re looking at this post, I’m sure you’ve realized that when you use the filter of Internal ID in a Saved Search that it’s extremely difficult. Unless your environment looks like my temporary account with only 8 transactions listed… You’ll more than likely know the pains of the horrendously long load times and then the struggle to find the exact transaction you’re looking for. Obviously this is used on a situational basis and won’t make sense to use in some cases. However, when needed… it’s very very handy!

Example from my temporary account – Easy to find your transactions!

In contrast, when you’re working in a live environment, you can have literally hundreds of thousands of records to individually search for, if they were not created directly one after the other… What a pain!

Example from a live environment.

The beauty of the method I’m going to demonstrate is that it can be done using a list from a spreadsheet. Let’s be honest, nine times out of ten you’ll be working from a spreadsheet regardless! It’s just the nature of the beast.

When would I use something like this?

Let’s say you have an integration or a CSV import that you just ran, and your accounting team realized that there are errors with a random listing out of the transactions brought in. Often times they’ll conveniently send you a spreadsheet with a list of records. I would use this method to quickly find only those orders to investigate further. In some cases, you may need to delete them all together! You can do that here too! I’ll put up another guide on how to quickly delete from a saved search soon.

On to the good stuff…

How to use a CSV/Spreadsheet to set specific internal ID’s on a Saved Search

For this example, I’m going to use a very short list. Please note that how we’re going to set this up may require split batches due to field character limits. To save myself hassle, I keep a template saved and ready to go then just update the ID’s. Here’s the list I want to search on specifically.

We’re going to setup a basic CASE/WHEN statement, that we can throw into the saved search in a few minutes.

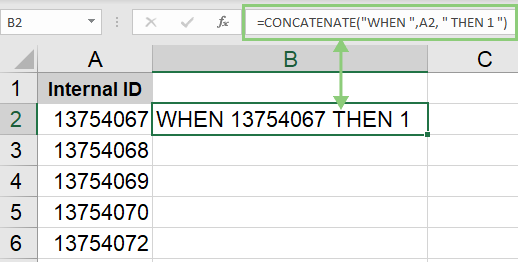
=CONCATENATE("WHEN ", A2 , " THEN 1 ")

This is the formula that we’re going to set up in cell B2 next to the first ID that we want to use. Basically we’re going to use the spreadsheet to build our statement. Here’s what it should look like in action.

Click + hold + drag the small box in the bottom right corner of B2 down to the last ID that you want to use this with, or double click it to auto-fill. Now that our spreadsheet is done let’s move to the Saved Search. Again, I’d recommend saving this as a template so you can just paste over the ID’s for faster future use.

Saved Search Setup

Start with your basic transaction search. For this example, I’m going to use an Invoice search. You can use criteria additional to these listed, but this is the basic setup to retrieve only the invoices that have the same Internal ID listed in the Spreadsheet we setup. Yours will obviously be different, that shouldn’t need to be said.

  • Type is Invoice
  • Main Line is true
  • Formula (Numeric) – We’ll set this up now.

At this point, your search should look like this:

Next, click the “Set Description” icon (circled in the image above). Here’s where we’re going to insert part of the statement we setup in the spreadsheet.

The entire statement should look something like this:

CASE {internalid} WHEN 13754067 THEN 1 WHEN 13754068 THEN 1 WHEN 13754069 THEN 1 WHEN 13754070 THEN 1 WHEN 13754072 THEN 1 ELSE 0 END

Basically what it’s saying is “Only retrieve invoices when the internal id is 13754067, 13754068, 13754069, 13754070, or 13754072. Otherwise ignore them!”

Lastly, switch to the results tab and choose what you’d like to see. For my example I’m only going to use these results for confidentiality purposes.

  • Date
  • Document Number
  • Amount

Save and Run the search and here are my results. You should have something similar.

This may seem like it takes too long to setup… but once you have your templates saved and the first search under your belt, it will be much quicker. As I said previously, I use this in rare situations. It’s a great trick to have in your arsenal.

As always, please let me know if this was useful, confusing or otherwise. I’m always open to new ideas and feedback. If you have another method, I’d love to hear what you do!

Date/Time Formats

Working with dates and times can be very frustrating. I personally spent forever looking all over the internet for a very specific format. Finally I found it, and unfortunately now I cannot remember where I snagged this table from. However, I thought it could prove useful in the future for either my own future work or others. Let’s be honest, there are far too many to remember!

If/when I find the source location, I’ll include it in the caption below.

Timestamp FormatExample
yyyy-MM-dd’T’HH:mm:ss*SSSZZZZ2018-08-20’T’13:20:10*633+0000
yyyy MMM dd HH:mm:ss.SSS zzz2017 Mar 03 05:12:41.211 PDT
MMM dd HH:mm:ss ZZZZ yyyyJan 21 18:20:11 +0000 2017
dd/MMM/yyyy:HH:mm:ss ZZZZ19/Apr/2017:06:36:15 -0700
MMM dd, yyyy hh:mm:ss aDec 2, 2017 2:39:58 AM
MMM dd yyyy HH:mm:ssJun 09 2018 15:28:14
MMM dd HH:mm:ss yyyyApr 20 00:00:35 2010
MMM dd HH:mm:ss ZZZZSep 28 19:00:00 +0000
MMM dd HH:mm:ssMar 16 08:12:04
yyyy-MM-dd’T’HH:mm:ssZZZZ2017-10-14T22:11:20+0000
yyyy-MM-dd’T’HH:mm:ss.SSS’Z’2017-07-01T14:59:55.711’+0000′
2017-07-01T14:59:55.711Z
yyyy-MM-dd HH:mm:ss ZZZZ2017-08-19 12:17:55 -0400
yyyy-MM-dd HH:mm:ssZZZZ2017-08-19 12:17:55-0400
yyyy-MM-dd HH:mm:ss,SSS2017-06-26 02:31:29,573
yyyy/MM/dd*HH:mm:ss2017/04/12*19:37:50
yyyy MMM dd HH:mm:ss.SSS*zzz2018 Apr 13 22:08:13.211*PDT
yyyy MMM dd HH:mm:ss.SSS2017 Mar 10 01:44:20.392
yyyy-MM-dd HH:mm:ss,SSSZZZZ2017-03-10 14:30:12,655+0000
yyyy-MM-dd HH:mm:ss.SSS2018-02-27 15:35:20.311
yyyy-MM-dd HH:mm:ss.SSSZZZZ2017-03-12 13:11:34.222-0700
yyyy-MM-dd’T’HH:mm:ss.SSS2017-07-22’T’16:28:55.444
yyyy-MM-dd’T’HH:mm:ss2017-09-08’T’03:13:10
yyyy-MM-dd’T’HH:mm:ss’Z’2017-03-12’T’17:56:22′-0700′
yyyy-MM-dd’T’HH:mm:ss.SSS2017-11-22’T’10:10:15.455
yyyy-MM-dd’T’HH:mm:ss2017-02-11’T’18:31:44
yyyy-MM-dd*HH:mm:ss:SSS2017-10-30*02:47:33:899
yyyy-MM-dd*HH:mm:ss2017-07-04*13:23:55
yy-MM-dd HH:mm:ss,SSS ZZZZ11-02-11 16:47:35,985 +0000
yy-MM-dd HH:mm:ss,SSS10-06-26 02:31:29,573
yy-MM-dd HH:mm:ss10-04-19 12:00:17
yy/MM/dd HH:mm:ss06/01/22 04:11:05
yyMMdd HH:mm:ss150423 11:42:35
yyyyMMdd HH:mm:ss.SSS20150423 11:42:35.173
MM/dd/yy*HH:mm:ss08/10/11*13:33:56
MM/dd/yyyy*HH:mm:ss11/22/2017*05:13:11
MM/dd/yyyy*HH:mm:ss*SSS05/09/2017*08:22:14*612
MM/dd/yy HH:mm:ss ZZZZ04/23/17 04:34:22 +0000
MM/dd/yyyy HH:mm:ss ZZZZ 10/03/2017 07:29:46 -0700
HH:mm:ss11:42:35
HH:mm:ss.SSS11:42:35.173
HH:mm:ss,SSS11:42:35,173
dd/MMM HH:mm:ss,SSS23/Apr 11:42:35,173
dd/MMM/yyyy:HH:mm:ss23/Apr/2017:11:42:35
dd/MMM/yyyy HH:mm:ss23/Apr/2017 11:42:35
dd-MMM-yyyy HH:mm:ss23-Apr-2017 11:42:35
dd-MMM-yyyy HH:mm:ss.SSS23-Apr-2017 11:42:35.883
dd MMM yyyy HH:mm:ss23 Apr 2017 11:42:35
dd MMM yyyy HH:mm:ss*SSS23 Apr 2017 10:32:35*311
MMdd_HH:mm:ss0423_11:42:35
MMdd_HH:mm:ss.SSS0423_11:42:35.883
MM/dd/yyyy hh:mm:ss a:SSS8/5/2011 3:31:18 AM:234
MM/dd/yyyy hh:mm:ss a9/28/2011 2:23:15 PM

Editing Amortization Schedules

In this example, our bill is to start being recognized at the end of August.

The current schedule breaks the recognition down by month which is how in this example we have the schedule template configured. However, this case is unique and only for this entry we need it to be different.

We pay a lump sum of $3000.00 to cover August, September, and October. The schedule needs to begin recognizing the expense again in November and December for $1000.00 each. Is this possible?

Absolutely! To do this, we just edit the schedule.
Remember: Your company needs to have this option enabled.

Simply modify these at their line levels and change the amount to match the lump sum, in this case $3000.00. Then remove the lines for the months that you don’t want the schedule to run on.

Easy right?

Please like this post if it was helpful to you!

How to Enable Amortization Schedule Editing

There may be cases in which you or a colleague/client will need to edit an Amortization Schedule. May it be because it was created incorrectly or just simply needs to be updated for a specific case.

This is generally easy to do but… Oh no! I can’t edit the schedule??

Solution #1

The most common reason for this is that the option to edit Amortization Schedules has been disabled during company setup. Verify with your NetSuite Administrator that your setup is configured to allow this.

Ask them to Navigate to Setup > Accounting > Accounting Preferences and check the Amortization section on the General tab.

Make sure that Allow Users to Modify Amortization Schedule is checked.

Solution #2

The next possibility is that your Role or User doesn’t have permissions to Amortization Schedules.

This can be set either on the entire Role or you can set this as a Global Permission on the User level.

Updating User Role

  1. Navigate to Setup > Users/Roles
  2. Select Edit next to the Role needing permissions
  3. Scroll down to the Permissions subtab and choose Lists
  4. Look for the permission Amortization Schedules and either update the level if it’s set to View or Create to at least Edit. If the user is going to need to delete schedules be sure to set this as Full.

    If the permission isn’t listed at all, you will need to Add Row, choose the permission, then indicate which level of access you’d like them to have.

Permission Levels
View – Read only access
Create – Can view and create, but cannot modify or delete
Edit – Can view, create, and modify but cannot delete
Full – Can do everything include delete

Granting Global Permission One User

An alternate method you can use is to give only ONE or specific people access so that you do not need to clutter up your Roles. Keep in mind the permission levels will be the same so see above for more details.

  1. Open the Users Employee record in Edit mode.
  2. Scroll down to the Access subtab
  3. Open the Global Permissions Sublist
  4. Add the new Permission and Level

Custom Role: Transactions Sublist Missing on Vendor Records

After creating a custom role for users you may stumble across an issue where the user is unable to see the Transaction Sublist under the Financial Subtab. It just doesn’t exist at all!

This can be a major problem if the users within the role are expected to view Sales Orders, Invoices, etc that have be created under specific Vendors.

Solution:

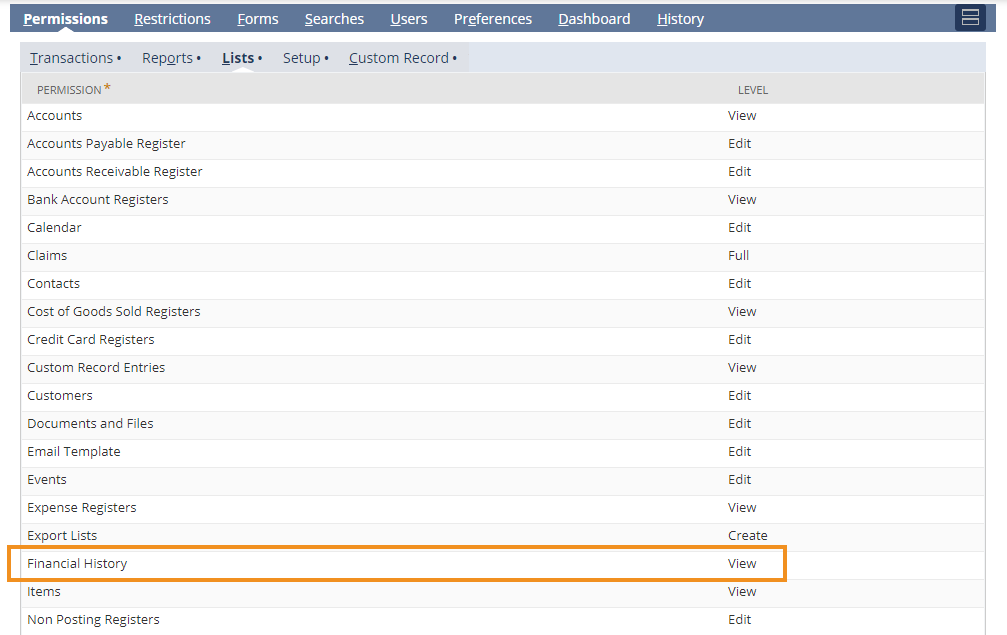
Simply edit the Custom Role make sure it has a minimum of View Level Permissions to Financial History under the Lists subtab.

Save the Custom Role and have the users logout and back into NetSuite. They should all now be able to see the Transactions Sublist.

Saved Search to Count Records Created by Month

The above is created from a Saved Search and added to our Dashboard in a portlet for quick visibility. Something like this can come in handy when looking at essentially any type of record.

The formula that we would use is:

DECODE (to_char({datecreated}, ‘MM’), ’01’ , 1)

This is in the most basic form and can be modified to fit your needs. You can drill down to the specific month as a whole or as minuscule as date of the month.

Something to note is that this can also be used on the dates of the System Notes. Change the {datecreated} to {systemnotes.date}. Be sure that your initial criteria is set to look directly at the system notes to prevent any funny business.

Date FormatsDate in FormulaExpected Date Long Expected Date Short
MM01January1
MMDD0101January 11/1
MMDDYY010119January 1, 20191/1/19
MMDDYYYY01012019January 1, 20191/1/2019

Select Transaction (or your desired record type)

Name your search in the Search Title field.

In the Criteria tab > Standard Subtab add the filters as needed:
Type is Opportunity (or your desired transaction type)

On the Results tab > Columns Subtab, set the following:

FieldSummary TypeFormulaCustom Label
Formula (Numeric)SumDECODE (to_char({datecreated}, ‘MM’), ’01’ , 1)January
Formula (Numeric)SumDECODE (to_char({datecreated}, ‘MM’), ’02’ , 1)February
Formula (Numeric)SumDECODE (to_char({datecreated}, ‘MM’), ’03’ , 1)March
Formula (Numeric)SumDECODE (to_char({datecreated}, ‘MM’), ’04’ , 1)April
Formula (Numeric)SumDECODE (to_char({datecreated}, ‘MM’), ’05’ , 1)May
Formula (Numeric)SumDECODE (to_char({datecreated}, ‘MM’), ’06’ , 1)June

Duplicate these in the Columns Subtab for as few or many Months/Dates you would like to count. Refer to the table above to see how to break these counts down by specific dates.

When you’re finished, Save and Run!

Design a site like this with WordPress.com
Get started